A client recently requested to move from an on-prem Windows Server to Azure AD in the cloud. The client is currently utilizing Microsoft 365 for email, Teams, etc., so they won’t be starting from scratch. Obviously, the first recommended step is to install Azure AD Connect and create a Hybrid Joined environment. That step has been done, and you can read about how to set that up here. The on-prem server will eventually be removed and users will create a new local profile once the computer has been unjoined from the domain and then Entra ID joined. The user profile files will still need to follow the user. You can read about Undoing Folder Redirection here.
This blog details one of the next steps of undoing Windows Server Update Services (WSUS). WSUS in an on-prem environment is a very common practice and allows a company to granularly approve and schedule when endpoint computers receive updates from Microsoft.
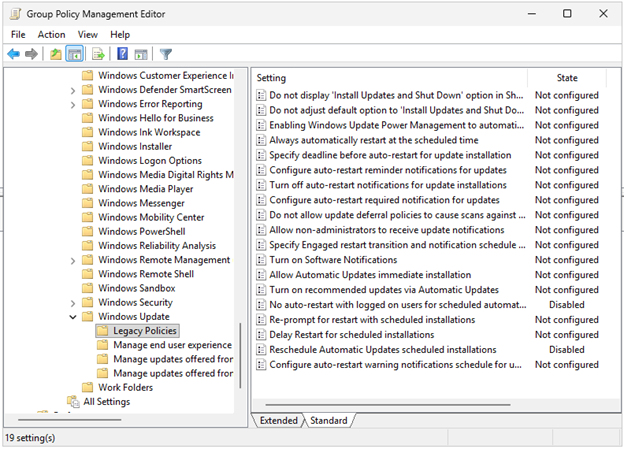
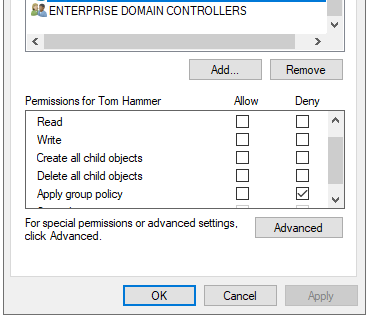
Let’s get started. We’ll need to create a new Group Policy Object (GPO), and we’ll name it ‘Undo WSUS’. If you previously created a separate policy that only configured WSUS, then copy the policy and rename it. Browse to the Windows update settings at Computer Configuration -> Policies -> Administrative Templates -> Windows Components -> Windows Updates. Any settings that were previously ‘Enabled’ will need to be set to ‘Disabled’, then close the dialog box. In the Scope tab, you can either try this out on a single computer for testing or add ‘Domain Computers’ if you’re ready to change all computers. If you want to test on a single computer, you’ll also need to add that computer to the current WSUS policy and set it to ‘Deny’ the ‘Apply group policy’ setting under the Delegation tab. This will prevent conflicting GPOs.
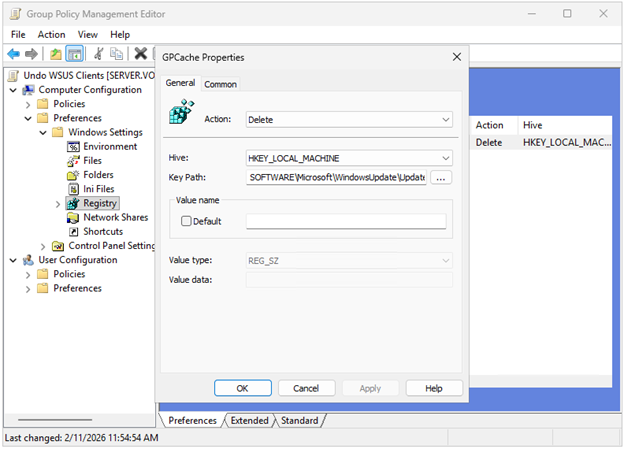
One final step in this new GPO. Microsoft regularly copies these policy settings to [HKLM\SOFTWARE\Microsoft\WindowsUpdate\UpdatePolicy\GPCache], which have been known to cause future problems even if you want to use Intune Windows Update for Business, so we’ll set the same GPO to delete this key. Edit the GPO and go to Computer Configuration -> Preferences -> Windows Settings -> Registry. Right-click -> New -> Registry item. Change the action to Delete, leave the Hive to HKEY_LOCAL_MACHINE, and change the Key Path to SOFTWARE\Microsoft\WindowsUpdate\UpdatePolicy\GPCache. Click OK and close the dialog box.
[Edit] I’ve discovered there may be a remaining key that needs to be deleted on each computer so that Windows Update for Business works properly. You can add this key to Delete in the same policy as above: HKEY_LOCAL_MACHINE\Software\Policies\Microsoft\Windows\WindowsUpdate\AU.
Alternatively, you can create a separate policy that only deletes both keys and change the link order to execute this policy first.
Once these changes are made, link the GPO, then open a command prompt on the on-prem server and run the command gpupdate /force. For end users to get the update, they will need to reboot their computer. Since GPOs sometimes don’t get applied right away, it is also recommended to do a gpupdate /force on the user’s computer before rebooting.
Once the computer is rebooted, check the user’s registry values at [HKLM\Software\Policies\Microsoft\Windows\WindowsUpdate] have been deleted.
One final note. I’ve seen references that say you can delete the key [HKLM\Software\Policies\Microsoft\Windows\WindowsUpdate] rather than change the WSUS settings to Disabled, but I have not tested it.
After all domain computers have been updated, you can remove the Windows Server Update Server Update Services role on the on-prem server and unlink any GPOs created for this migration.


Leave a comment